Hi, guys in this tutorial, you would learn how to connect your Blazor WebAssembly application to Firebase Cloud Firestore and how to execute some actions in it like reading data from Firestore and deleting data from Firestore.
Introduction
Blazor WebAssembly hosting model enables users to run client-side web applications using the .NET run time with the aid of WebAssembly.
Firebase Cloud Firestore is a real-time database service provided by Firebase which aids to create an easy document-based database that clients can interact with
Setting Up Cloud Firestore for Blazor WebAssembly
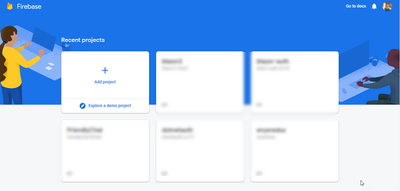
- Go to https://console.firebase.google.com to create a project.
- Click on the Add project button.
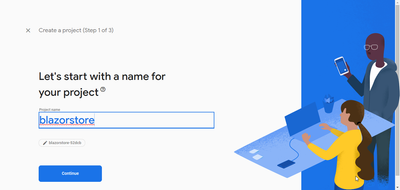
- Input any project name of your choice (I am using blazorstore).
- Click on the Continue button.
- Disable the Enable Google Analytics for this project and click on the Create project button.
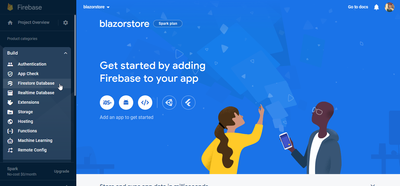
- To activate Cloud Firestore, click on the Build drop-down menu from the left panel.
- Select the Firestore Database option.
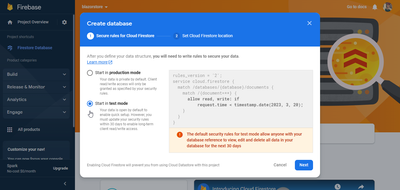
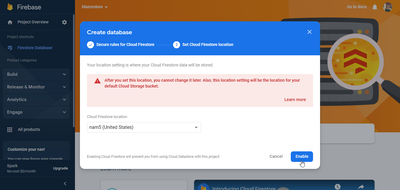
- Next click on the Create database option.
- From the displayed dialog box click on the Start in test mode option (this is just for development purposes).
- Click on the Next button and click on the Enable button.
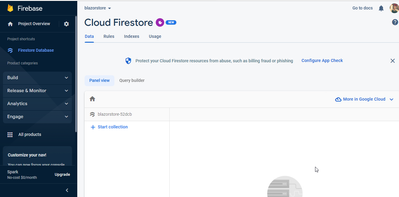
- Now you should see a FireStore interactive interface.
- Next, you need to register an application that would have access to the Firestore database.
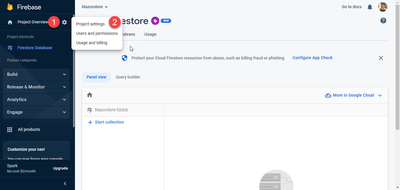
- To do that click on the Project Overview menu and the Project settings option respectively.
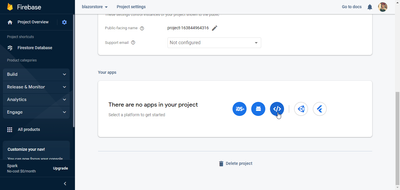
- Scroll down and click on the web option
- Register your application using any name of your choice (I would be using blazorstore).
- Click on the Register.


- You should see some configuration details. Copy the firebaseConfig variable and store it temporarily.

Creating a Blazor WebAssembly App
In this part of this tutorial, you’ll be needing Visual Studio Code along with the GitHub Copilot extension as an assistive tool. So below are the required steps to get the app running
- To set up the Blazor WebAssembly template, open your terminal in the directory of your choice and type:
dotnet new blazorwasm -o blazorfirestore
- The blazorfirestore in the command above is the name of the folder I want the template to be generated in but you can decide to use a different name.
- Next, execute:
# to navigate to blazorfirestore directory
cd blazorfirestore

# to open Visual Studio Code in the blazorfirestore directory
code .
- The command above would open visual studio code in the blazorfirestore directory.
Accessing Cloud Firestore data in Blazor WebAssembly
In this section, you’ll be setting up the Cloud Firestore library and how to make it accessible in the Blazor web application. You would also see how to call Cloud Firestore Javascript Function from C#.
- Open the index.html in the wwwroot folder
- Below the body tag in the index.html file paste the code below
<script type="module">
  import { initializeApp } from "https://www.gstatic.com/firebasejs/9.17.1/firebase-app.js";

  import {
    getFirestore,
    collection,
    addDoc,
    getDocs,
    deleteDoc,
    doc,
  } from "https://www.gstatic.com/firebasejs/9.17.1/firebase-firestore.js";

  // Firebase configuration details
  // replace this configuration with your own configuration details
  const firebaseConfig = {
    apiKey: "AIzaSyB4ftsDO2tLVEi69rxACNcLlNLwjUw9_LY",
    authDomain: "blazorstore-52dcb.firebaseapp.com",
    projectId: "blazorstore-52dcb",
    storageBucket: "blazorstore-52dcb.appspot.com",
    messagingSenderId: "163844964316",
    appId: "1:163844964316:web:e85ac73ba9cbb150391919",
  };

  // Initialize Firebase with the configuration details
  const app = initializeApp(firebaseConfig);

  // Initialize Cloud Firestore and get a reference to the service
  const db = getFirestore(app);

  // Define a function to add a new user to the Firestore database
  window.addUser = async (user) => {
    try {
      const docRef = await addDoc(collection(db, "users"), {
        name: user,
      });
    } catch (e) {
      console.error("Error adding document: ", e);
    }
  };

  // Define a function to get all the users from the Firestore database
  window.getUsers = async () => {
    const querySnapshot = await getDocs(collection(db, "users"));
    let dataArray = querySnapshot.docs.map((doc) => ({
      id: doc.id,
      userName: doc.get("name"),
    }));

    return dataArray;
  };

  // Define a function to delete a user from the Firestore database
  window.deleteUser = async (userId) => {
    try {
      await deleteDoc(doc(db, "users", userId));
      console.log("Document with ID", userId, "deleted successfully.");
    } catch (e) {
      console.error("Error deleting document: ", e);
    }
  };
</script>
Ensure you replace the firebaseConfig with the one you copied earlier from the Firebase portal.
- The reason for attaching the Firebase functions to the window global object is to make it accessible to methods in Blazor.
- Next, in the Pages directory create a Users.razor file.
- Paste the code below in the User.razor.
@page "/users"
<!-- Injects the IJSRuntime service, which allows the component to call JavaScript functions -->
@inject IJSRuntime JS
<!-- Displays the title "Firebase" -->
<h1> Firebase </h1>
<!-- Input box to add a new user -->
<div>
    <!-- Binds the currentUser variable to the input box -->
    <input @bind=@currentUser/>
    <!-- Binds the AddUser method to the button -->
    <button @onclick="AddUser">Add</button>
</div>
<br />

<!-- Displays the list of users if isLoading is false -->
@if (!isLoading)
{
    <!-- Loops through the userList -->
    @foreach(var user in userList)
    {
        <div>
            <!-- Displays the user's name -->
            .UserName
            <!-- Binds the DeleteUser method to the delete button -->
            <button @onclick="()=>DeleteUser(user.Id!)"> Del</button>
        </div>
        <br/>
    }
}
else
{
    <p>Loading...</p>
}
@code {
// A list of User objects to store the users
    private List<User> userList = new();
// A flag to indicate if the component is still loading
    private bool isLoading = true;
// The name of the new user to add
    private string? currentUser;
// Adds a new user to Firebase
    private async Task AddUser()
    {
// Invokes a JavaScript function to add the user to Firebase
        await JS.InvokeVoidAsync("addUser", currentUser);
// Clears the input box
        currentUser = null;
// Retrieves the updated list of users from Firebase
        userList = await JS.InvokeAsync<List<User>>("getUsers");
    }
// Deletes a user from Firebase
    private async Task DeleteUser(string userId)
    {
// Removes the user from the userList
        userList = userList.Where(i => i.Id != userId).ToList();
// Invokes a JavaScript function to delete the user from Firebase
        await JS.InvokeVoidAsync("deleteUser", userId);
    }
// Retrieves the list of users from Firebase after the component has rendered
    protected override async Task OnAfterRenderAsync(bool firstRender)
    {
        if (firstRender)
        {
// Retrieves the list of users from Firebase
            userList = await JS.InvokeAsync<List<User>>("getUsers");
// Sets isLoading to false to indicate that the component has finished loading
            isLoading = false;
// Forces the component to re-render
            StateHasChanged();
        }
    }
// A class to represent a user
    private class User
    {
        public string? Id { get; set; }
        public string? UserName { get; set; }
    }
}
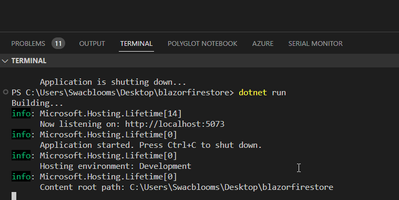
- Next, run your Blazor WebAssembly application by executing
dotnet run - I got to see this
- Navigating to http://localhost:5073/users should render the users component.

- From the user interface above you can see that there isn’t an option to navigate the Users Page from the side menu.
- To Fix it, stop the dotnet server and open the NavMenu.razor file in the shared directory. Add the code below as the first child of the nav element.
<div class="nav-item px-3">
  <NavLink class="nav-link" href="users">
    <span class="oi oi-list-rich" aria- hidden="true"></span> Users
  </NavLink>
</div>
- Next, start the server again by executing dotnet run. You should be able to see the Users menu in the nav panel.

Thanks for reading through 👋
To access the GitHub Repository you can click https://github.com/sammychinedu2ky/blazorfirestore.
To learn more about Blazor you can click https://learn.microsoft.com/en-us/aspnet/core/blazor.


Notification; TRANSFER 0,75452831 bitcoin. Get > https://telegra.ph/Get-BTC-right-now-01-22?hs=ead9ed1e8e945badf3b4a7cec4230271&
rbqygl
You have 1 notification № 999582. Go >>> https://telegra.ph/Get-BTC-right-now-01-22?hs=ead9ed1e8e945badf3b4a7cec4230271&
a5x5vz
You have received a message(-s) № 678696. Open >>> https://telegra.ph/Binance-Support-02-18?hs=ead9ed1e8e945badf3b4a7cec4230271&
omkpag
You have a gift from our company. Receive >> https://graph.org/GET-BITCOIN-TRANSFER-02-23-2?hs=ead9ed1e8e945badf3b4a7cec4230271&
zh28kn
Email: Process 1,18646 BTC. Continue =>> https://graph.org/Message--120154-03-25?hs=ead9ed1e8e945badf3b4a7cec4230271&
xlekpv
+ 1.113914 BTC.GET - https://graph.org/Message--05654-03-25?hs=ead9ed1e8e945badf3b4a7cec4230271&
j070nu
Ticket: TRANSACTION 1,657855 BTC. GET > https://graph.org/Message--17856-03-25?hs=ead9ed1e8e945badf3b4a7cec4230271&
6g3817
Email- TRANSACTION 1.937368 BTC. Verify >> https://graph.org/Message--0484-03-25?hs=ead9ed1e8e945badf3b4a7cec4230271&
1qwshl
Notification- + 1.576214 BTC. Continue => https://yandex.com/poll/HsemiBCtfopPhJGk2rGvc2?hs=ead9ed1e8e945badf3b4a7cec4230271&
qi9cz9
+ 1.293903 BTC.NEXT - https://yandex.com/poll/enter/BXidu5Ewa8hnAFoFznqSi9?hs=ead9ed1e8e945badf3b4a7cec4230271&
eusizh
Reminder- SENDING 1,664885 BTC. Go to withdrawal => https://yandex.com/poll/enter/12JSER8t8KDJewYyTprg7K?hs=ead9ed1e8e945badf3b4a7cec4230271&
vszsb1
Email: SENDING 1,142182 bitcoin. Get =>> https://graph.org/Payout-from-Blockchaincom-06-26?hs=ead9ed1e8e945badf3b4a7cec4230271&
piol6p