Hello guys this tutorial covers how to create a pwa in two ways:
- By using plain old javascript
- By using an automation tool called “workbox”
But before we move on let me give you a simple definition of what a progressive web actually is. A progressive web app is an app that is made using web technologies and can work on any platform that uses a standard browser making it cross-platform compatible. It also has some special functionalities that enable it to work offline and also have access to the hardware of a device. There is more to this which you can read up here.
So let us jump right into the first one. To begin, I created a repo that we would be working with. You can find it here. You should have node.js installed and vs code editor to follow up or any other editor of your choice that you are comfortable with.
Steps in setting it up
- Clone the repo
- Run “npm install” in your terminal
- Run “npm start” to kickstart the server
- Go to your browser and type ” http://localhost:3000/ ” to access the site
Testing the site
We would be making use of lighthouse to test the site. Lighthouse is an open-source automation tool for improving the quality of web pages.

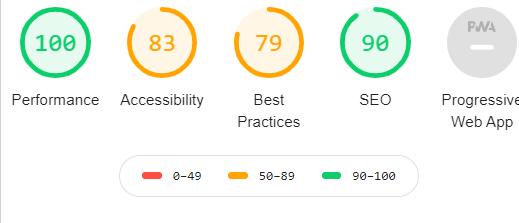
Click on the run audit to analyse the site. From the analysis, you would get a similar rating for the progressive web app

You can see that there is no rating for the PWA. why is this so? This is because a PWA primarily requires a service worker to function. And this isn’t available.
If you stop the server and try to access the site you would see that you can’t access it.
Adding Offline Capabilities
Next, let us add something called a service worker to enable the webpage to become available offline. Use this GitHub branch to follow up by clicking here
A service worker is a script that runs in the background giving your web app access to extra functionalities that makes it seem like a native app.
Add this code to the bottom of your index.html tag just before the closing body tag
<script>
if ('serviceWorker' in navigator) {
  window.addEventListener('load', function() {
    navigator.serviceWorker.register('service-worker.js')
      .then(reg => {
        console.log('Service worker registered!', reg);
      })
      .catch(err => {
        console.log('Service worker registration failed: ', err);
      });
  });
}
</script>
What the code does is that it registers the “service-worker.js” file if the service worker is found in the navigator object. The navigator.serviceWorker.register returns a promise that resolves if the registration is successful.
Next, create a service-worker.js file in the same directory as the index.js file.
Once done add the code below:-
const cacheName = 'pwatutorial-cache';
const precache = [
  '/',
  'index.html',
  'style.css',
 ];
The cacheName is the variable we would use to represent the name of our cache.
The precache variable is an array that defines the path relative to the service worker that we would cache. Then add this:-
self.addEventListener("install", async event => {
  console.log("Service worker install event!");
  try {
    let cache = await caches.open(cacheName);
    cache.addAll(precache);
  } catch (error) {
    console.log(error);
  }
});
The code above adds an install event to the service worker. Notice that the callback is an asynchronous function because of the “async” keyword that is attached to it. This would enable us to use the await keyword to wait for the caches.open method to resolve.
The install event is fired after the registration of the service worker takes place in the index.html file. The caches.open method returns a promise that resolves the cache object matching the cache name. The cache.addAll method retrieves the response of the response objects in the precache array and adds the responses to the cache object.
Then add this line of code:-
self.addEventListener("activate", async event => {
    const keys = await caches.keys();
    keys.map(key =>key!=cacheName? caches.delete(key):'');
  console.log("Service worker activate event!");
});
The code above adds an activate event listener to the service worker and it is fired after the install event only if there are no pages loaded that are using the old service worker.
The caches.keys method takes retrieves the properties/keys in the cache object and the caches.delete method deletes any key that doesn’t match up with the current cache key.
Ok, you might ask why you would want to delete the cache keys. The reason is that when you make an update to a file on your server, the change doesn’t reflect on your users’ devices because their devices would still be making use of the cached files
Now the reason why I didn’t add the “service-worker.js” file to the precache array is that I want it to act as a proxy of change between the updated files on the system and the one cached in my users’ devices.
So if I want the change to reflect on my users’ device I can achieve that by changing the “cacheName” variable. This would delete all other cache keys in the cache object when the activate event is fired. And subsequent request would make use of the recent cached response.
Ok, add this code:-
self.addEventListener("fetch", event => {
  console.log("Fetch intercepted for:", event.request.url);
  event.respondWith(
    caches.match(event.request).then(cachedResponse => {
      if (cachedResponse) {
        return cachedResponse;
      }
      return fetch(event.request);
    })
  );
});
The code above attaches a fetch event that is fired when a request is made in the browser.
The service worker intercepts the request and checks if the response of the request is available in the cache object.
If it is available then it returns the response. This feature is what makes the webpage to work offline.
Since we aren’t making a request to external links, we can stop here without making an XHR request to the server using the fetch method.
Testing the offline feature
Now start your server and access the page using this “http://localhost:3000”
Please try and load it on chrome as my illustration is going to be based on the chrome browser
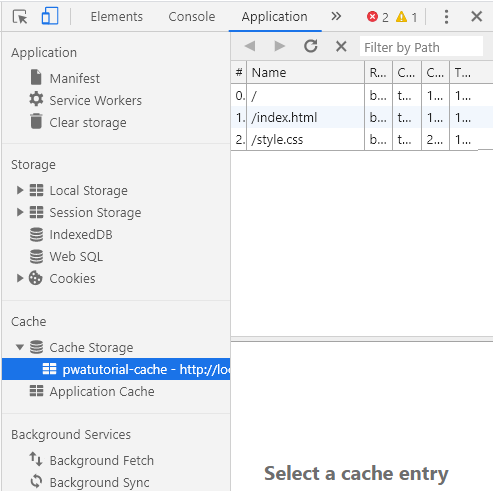
Once, you’ve succeeded in loading the page, go to your dev tools panel and navigate to your application tab. Under the Cache Storage section, you should see the name of your cache and on the right panel, you should see the cached responses.

Now stop your server and try to access the site. At this point, you should be able to still access the site because the response is being retrieved from the cache object.
Yh you did it. But let me add one more thing that will allow you to install the web page as an app on your device. And that is adding your web app manifest.json file
Creating your web app manifest.json file
A web app manifest.json file provides details necessary for your web app to be installed.
I can actually do this manually but instead of doing that I would leverage a tool I created for easy generation of required images and your manifest.json file. You can access the tool here. You can follow up with this section using this repo
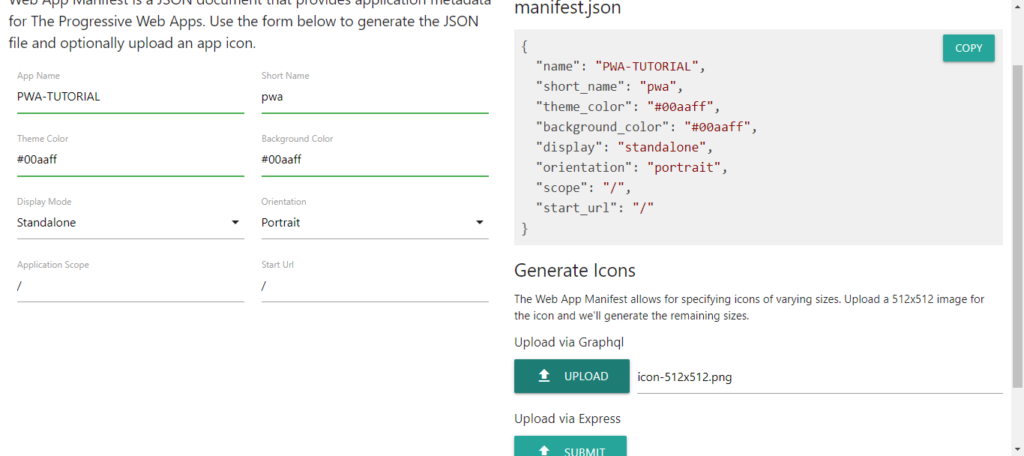
Try to fill the form to suit your needs. Once you are done upload an icon so that the required files will be generated for you. To know more about the function of the various fields seen use this link. Below is the response I filled:-

Add this line of code inside the head section of your index.html file:-
<link rel="manifest" href="./manifest.json">This reference would import the manifest.json file which would make your app installable on your device.
Unzip the file which you downloaded from the web-app manifest.json generator and copy the manifest.json file and the images folder in your root directory.
Now change the text in the header tag of your HTML from “INTRODUCTION” to ” PWA(JS DOCS) “
When you try refreshing the web page the title header doesn’t change to ” PWA(JS DOCS) ” because you haven’t updated the cache name and the new service worker isn’t yet activated. But you can see the installation prompt in the address bar. Which means you can now install your web page as an app

To automatically activate the service-worker, add this code to the install event listener section of your “service-woker.js” file:-
self.skipWaiting();Now change your “cacheName” variable to ” pwatutorial ” this will update the cache with the current files and also delete the old cache responses when updated.
So kudos for reading up till this section. The next section would describe how to make use of a tool called “workbox” to automate this process
To go to the next section click this

